Amazon Simple Email Service(SES) is a cloud email service provider that can integrate into any application for sending emails.
We can use the sendRawEmail method of SES to send emails with attachments. This method accepts only Multipurpose Internet Mail Extensions standard (MIME) type data as email content. Creating a MIME message yourself is a tedious task. But we can do this easily using a mailcomposer package.
In this article, we will see how we can send emails with Excel files as an attachment using mailcomposer.
Prerequisite for sending email using SES:
We can only send emails from and to verified email addresses or domains. We can verify any email address on the AWS SES console by following the steps below:
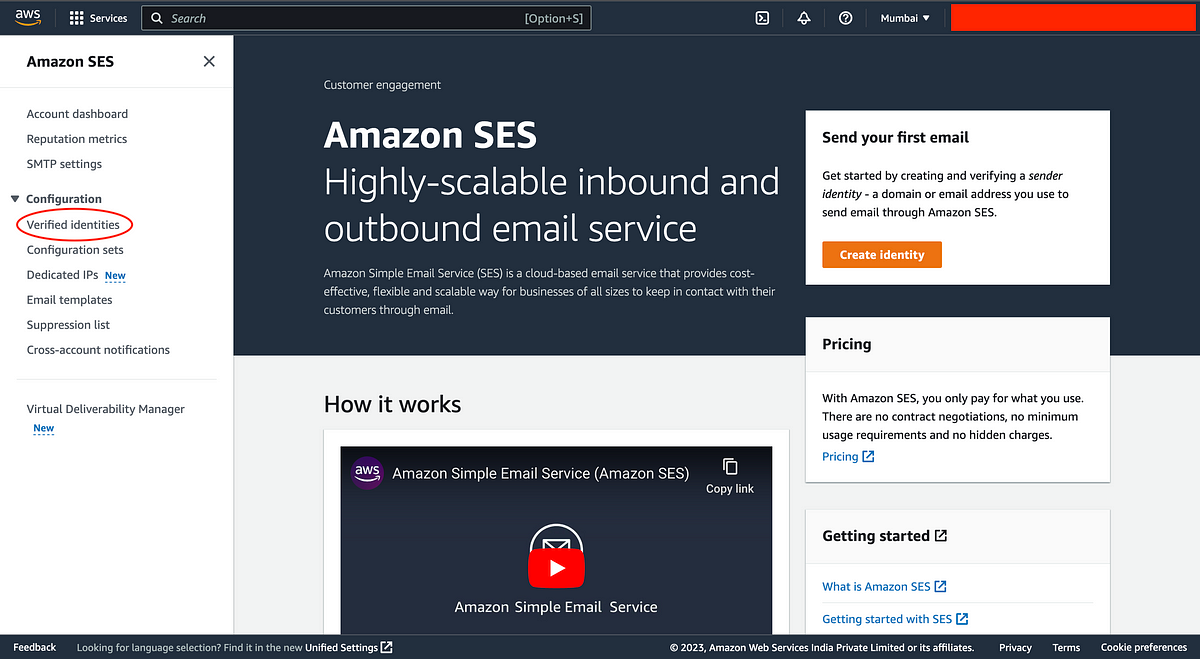
STEP 1: Go to the AWS SES console and click the Verified Identities option.
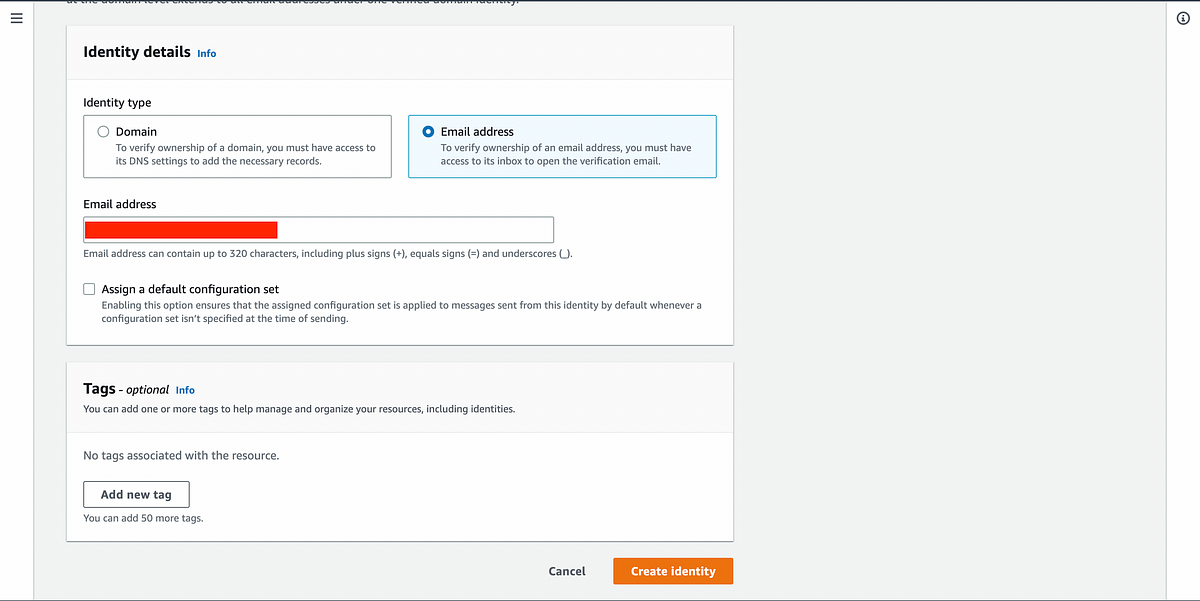
STEP 2: Click on the Create Identity option to create the identity of your email address.

STEP 3: Select the Email Address option in the identity type to verify a particular email address. Then enter your email address and click on Create identity.
Step 4: Now click on the verification link sent to your email address to complete verification. Now you can see your email address is going to be displayed with identity status as ‘verified’ under verified identities on the console.
Setup nodeJs app:
Now we will set up our node application
Run the following commands in the terminal:
npm init -y
npm i aws-sdk
npm i xlsx
npm i mailcomposer
aws-sdk — for calling SES sendRawEmail function
xlsx — for converting array of objects into excel file buffer
mailcomposer -for creating a MIME message for email
Create index.js file . This will be the main file where we write all our code.
Paste the below code in index.js file.
(async()=>{
const AWS = require('aws-sdk');
const XLSX = require('xlsx');
const mailcomposer= require('mailcomposer');
//create ses client with your AWS account access key id and secret access key
const sesClient = new AWS.SES({
accessKeyId: YOUR_ACCESS_KEY_ID,
secretAccessKey: YOUR_SECRET_ACCESS_KEY,
region: "ap-south-1"
});
/**
* To create excel file buffer from array of objects
* @param {*} data : [[], []] : For multiple sheets [[]]: for single sheet
* @param {*} sheetNames : ['sheet1', 'sheet2'] names of sheet
* @returns
*/
const createExcelFileBufferUsingXlsx = (data,sheetNames)=>{
const wb = XLSX.utils.book_new();
if(Array.isArray(data) && data.length && Array.isArray(data[0])) {
data.forEach((dataArray, idx) => {
const ws = XLSX.utils.json_to_sheet(dataArray);
XLSX.utils.book_append_sheet(wb, ws, sheetNames[idx]);
})
}
//creating buffer
const wbOpts = { bookType: "xlsx", type: "buffer" };
let fileBufferdata = XLSX.write(wb, wbOpts);
console.info('fileBufferdata::', fileBufferdata);
return fileBufferdata;
}
/**
* To send email with attachment using mailcomposer
* @param {*} sourceEmail
* @param {*} receiverEmail
* @param {*} fileBufferdata
* @returns
*/
const sendRawEmailUsingMailcompose = async(sourceEmail,receiverEmail,fileBufferdata)=>{
let sendRawEmailPromise ={};
//creating object with mentioned options
const mail = mailcomposer({
from: sourceEmail, //source email address
to: [receiverEmail], //array containing receiver's email addresses
subject:'Test mail', //subject of email
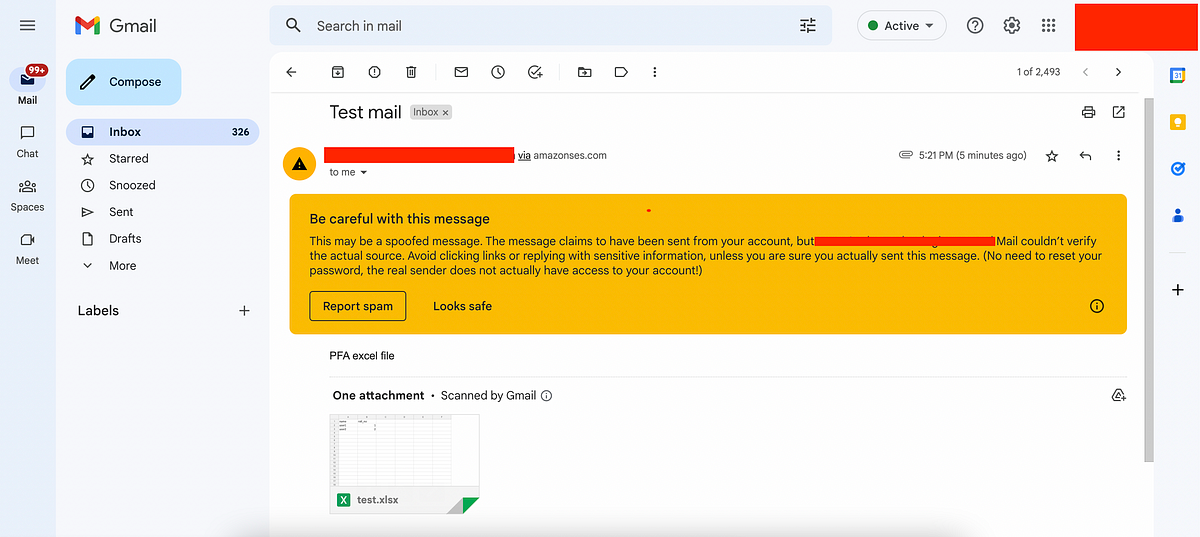
text: 'PFA excel file', //plain text to display in mail body
attachments: [{ //array of attachment object having below details
filename: "test.xlsx", //name of attachment
content: fileBufferdata.toString('base64').replace(/([^\0]{76})/g, "$1\n"), // buffered file data as base64 encoded
encoding: 'base64', //encoding type
}],
});
console.info("mail", mail);
return new Promise((resolve, reject) => {
//building message to send in email
mail.build((err, message) => {
if (err) {
reject(`Error sending raw email: ${err}`);
}
console.info("inside mail build");
//sending email after attaching excel file
sendRawEmailPromise = sesClient.sendRawEmail({RawMessage: {Data: message}}).promise();
resolve(sendRawEmailPromise);
});
});
}
const sendSesEmail=async()=> {
try {
const sourceEmail= "abc@gmail.com";
const receiverEmail= "xyz@gmail.com";
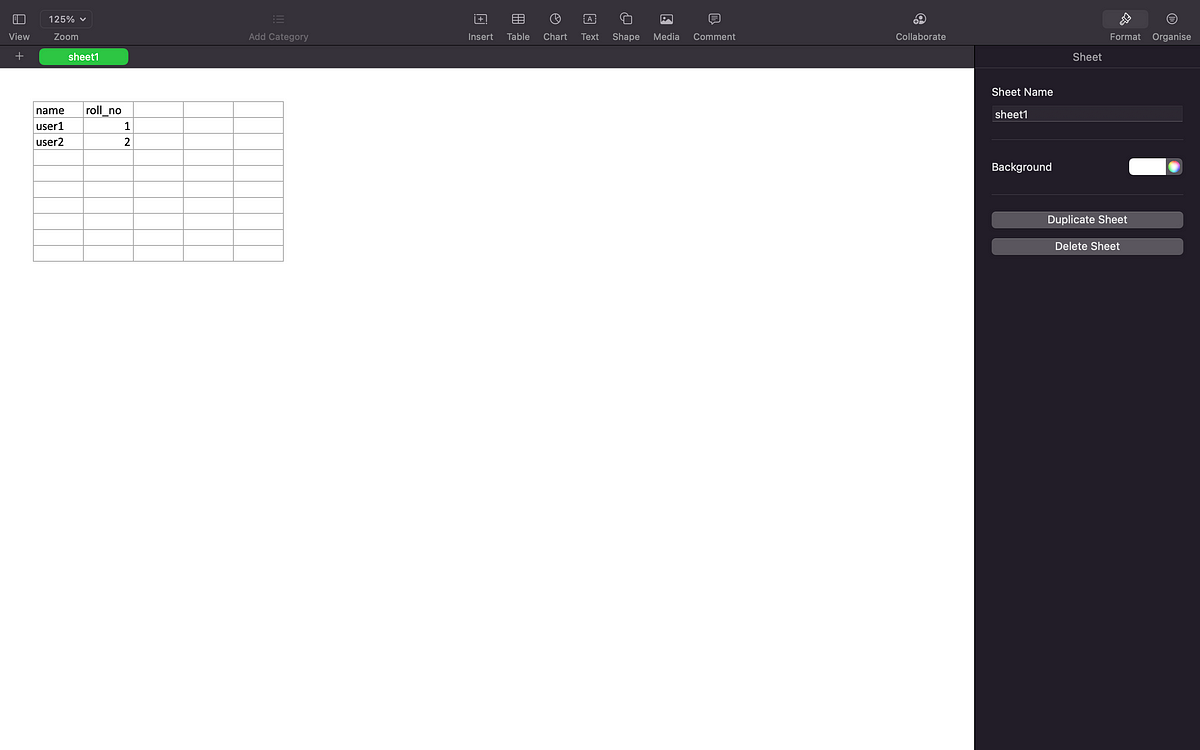
const data= [
{name:"user1", roll_no:1},
{name:"user2", roll_no:2}
]
console.info("sourceEmail, receiverEmail", sourceEmail, receiverEmail);
console.info("data", data);
const fileBufferdata= createExcelFileBufferUsingXlsx([data],["sheet1"]);
const sesResponse =await sendRawEmailUsingMailcompose(sourceEmail, receiverEmail,fileBufferdata);
console.info("sesResponse",sesResponse);
} catch (error) {
console.error(error);
}
}
await sendSesEmail()
})();
Code Flow:
- Firstly we have imported all required packages.
- Then we have created an object of the SES service using aws-sdk. Here replace YOUR_ACCESS_KEY_ID and YOUR_SECRET_ACCESS_KEY with your aws account key id and secret access key in code.
- sendSesEmail is our main function where all are processing will be done.
- In this function we have first declared sourceEmail(verified email address from which we will send email) and receiverEmail(verified email address to which we will send email).
- Then we have defined array of object which we will show in excel file.
- After that we have called the createExcelFileBufferUsingXlsx function which is using the xlsx package to convert our array of objects into an excel file buffer. We have passed array of objects and sheet name in argument.
- In this function, json_to_sheet() — will convert array of objects into worksheet, book_new() — will create a new workbook in a sheet , book_append_sheet() — will append the worksheet to the workbook with sheet name passed in arguments (i.e sheet1) and write() — will convert the created excel file into buffer.
- Then we have passed buffer data, source and receiver email in the sendRawEmailUsingMailcomposer function. This function is where we will create our email body using mailcomposer and call the sesRawEmail function to send email.
- Here we have first created a object of mailcomposer with options.
- Then we built a mail message using the build function of mailcomposer and passed that message to the sendRawEmail function of SES service which will send the email.
That’s it, now we can run above code using node index.js command. This will send the email with the attached excel file to the receiver. You can see the email sent using the above code in below images.