Hello Everyone In this article we will learn how to integrate Cashfree payments SDK in React Native Application.
The React Native Cashfree SDK
Cashfree provides a dedicated SDK for React Native. The Cashfree React Native SDK allows us to integrate Cashfree Payment Gateway into our application and start collecting payments from our customers. The React Native SDK has been designed to minimize the complexity of handling and integrating payments in your React Native project.
It’s very easy to integrate Cashfree payments into our React Native Application and can be done in a few steps.
Before we get to the SDK Integration first we have to create a free Cashfree account.
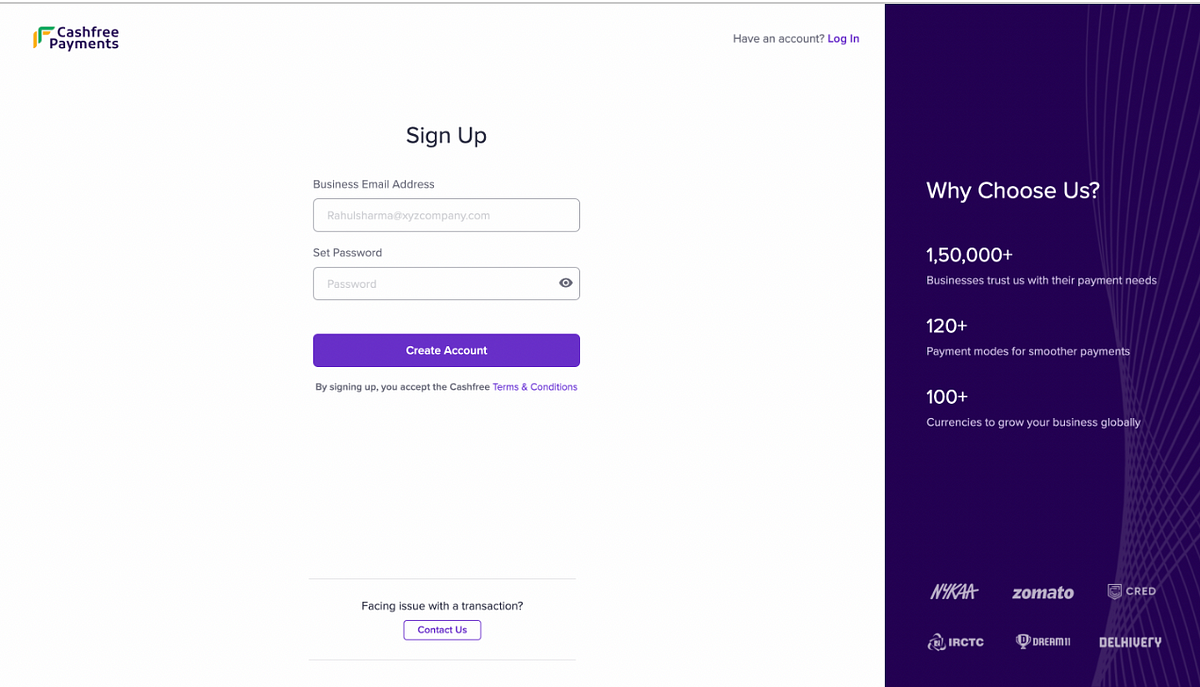
Create Account.
To create an account go to the Cashfree Payments website and click Create Account and fill in all the required fields.
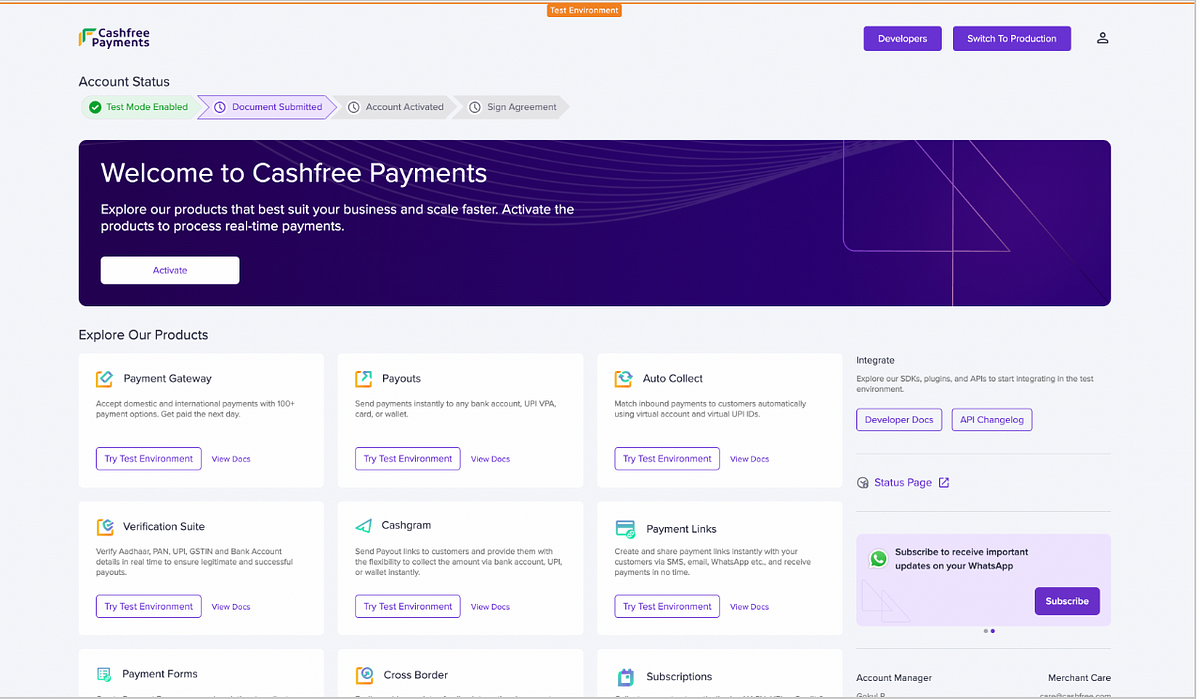
Once the account has been created we will have access to the test and production environments in which we can simulate multiple features of the Cashfree Payments.
After Creating account you will have the option to activate your account you can choose to activate it later and explore the test environment.
Note: To use the production environment we have to activate our account.
Once the account is created then Integration can be done in 4 easy steps:
1. Installing the SDK
The SDK can be installed easily just navigate to your project folder and run the “npm install react-native-cashfree-pg-sdk” command.
Once the installation is complete then open the “info.plist” file inside the project’s ios folder and add the following code.
After adding the above code update pods by running the following command
–cd ios
-pod install — repo-update
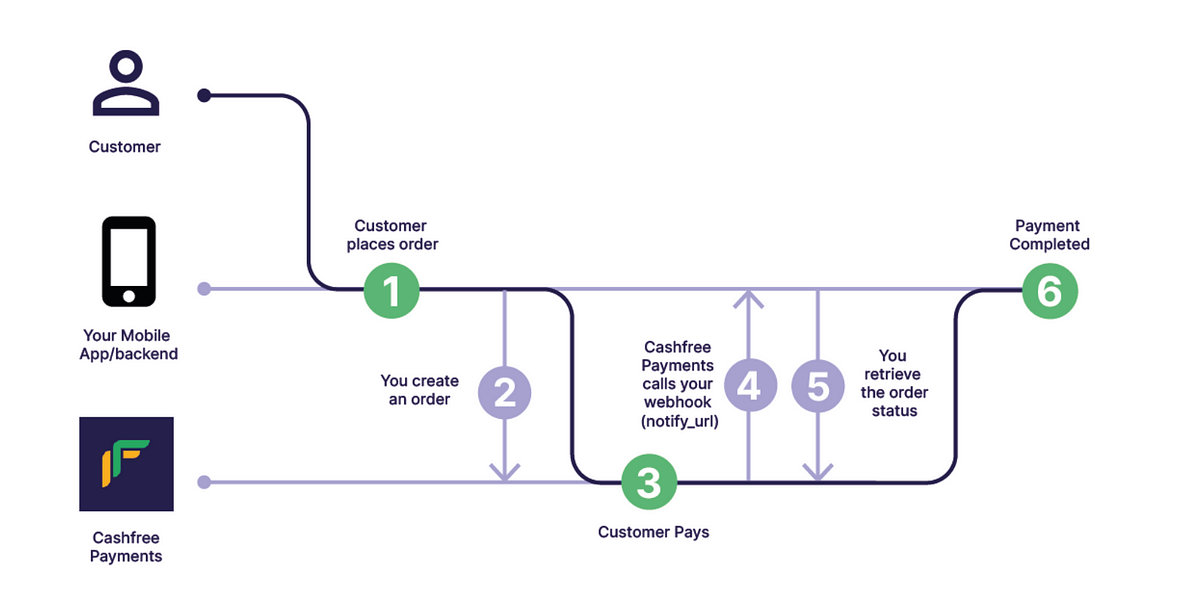
2. Create an order
The next step is to create the order for any payment merchant has to create an order. The order creation should be done from the backend due to security reasons.
Cashfree provides 2 APIs for order creation
1. For production: https://api.cashfree.com/pg/orders
2. For Testing: https://sandbox.cashfree.com/pg/orders
Request:
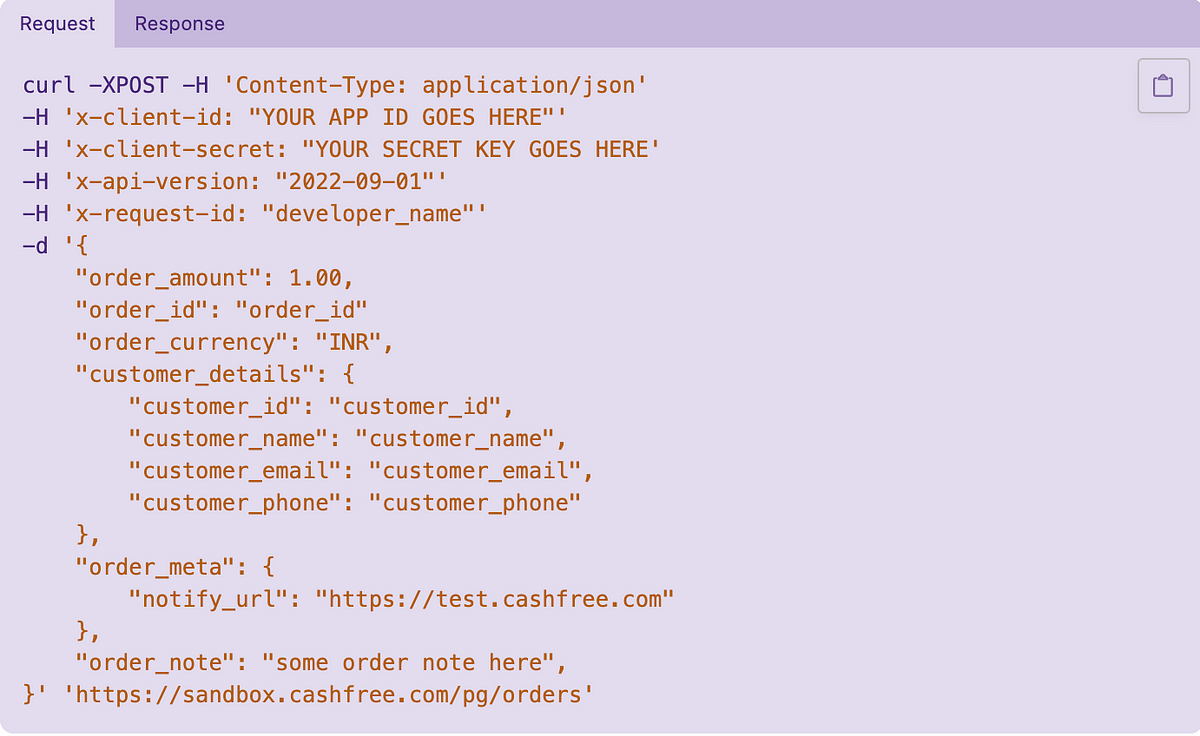
Note: The client secret key and APP id mentioned above can be obtained from the “https://merchant.cashfree.com/merchants/pg/developers/api-keys?env=test” link.
Response Body
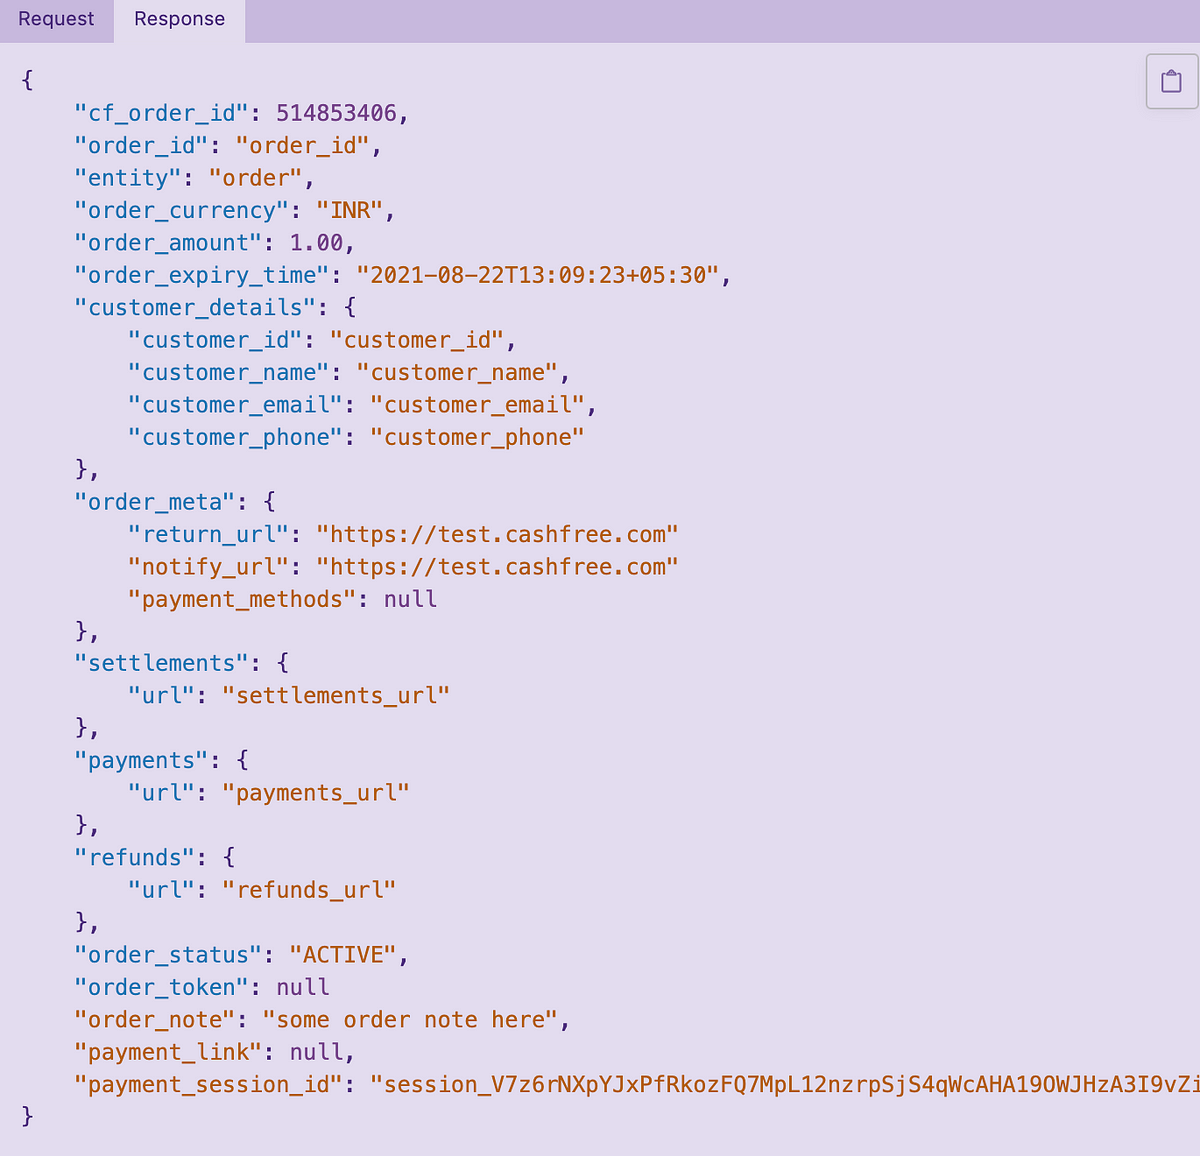
If the order creation is successful we will get the 200 response and all the relevant order details.
We will save payments_session_id, order_token, cf_order_id, and order_status at our end.
The “payment_session_id” is sent to the SDK for initiating payment as it contains all the necessary order details.
3. Initiate Payment- Drop Flow
Drop flow is the standard flow used by Cashfree for payments it handles all the business logic and the UI components so that the payments can be done smoothly.
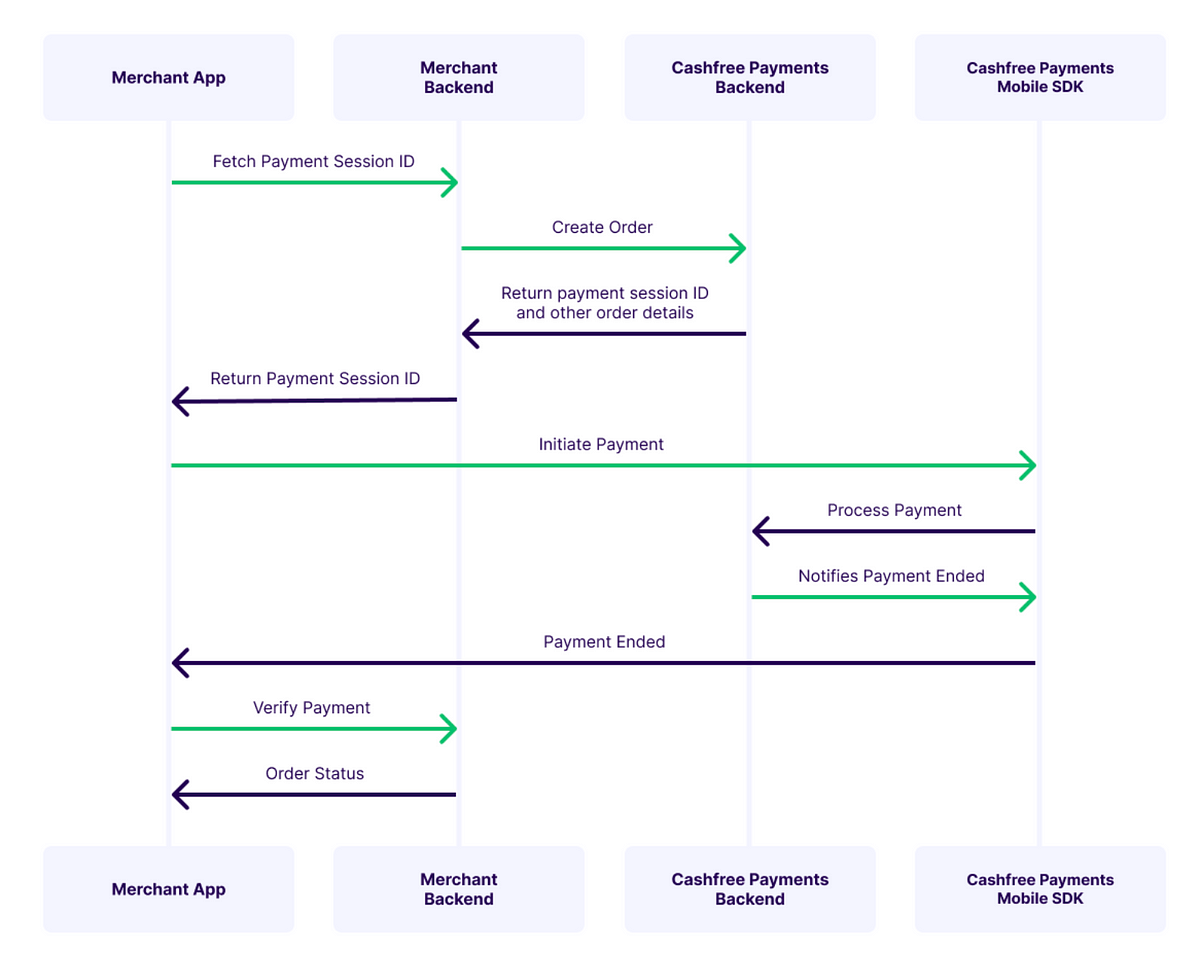
The next step is to initiate the payment.
To initiate the Drop Checkout in the SDK follow the following steps.
- 1. Create a CFSession object.
- 2. Create a CFPaymentComponents object.
- 3. Create a CFTheme object.
- 4. Create a Drop Checkout Payment object.
- 5. Set payment callback.
- 6. Initiate the payment using the payment object created above
- Create a CFSession object
The SDK exposes a class CFSession class that accepts payments_session_id which we got in the response of order creation API.
The values for the environment can only be SANDBOX and PRODUCTION.
SANDBOX for testing and PRODUCTION for the production environment
Specify the Environment and pass payment_session_id and order_id received from the create order API response.
2. Create Payments components object
This object specifies the payments mode which we want to show to our customers
const paymentModes = new CFPaymentComponentBuilder()
  .add(CFPaymentModes.CARD)
  .add(CFPaymentModes.UPI)
  .add(CFPaymentModes.NB)
  .add(CFPaymentModes.WALLET)
  .add(CFPaymentModes.PAY_LATER)
  .build();
3. Set a Theme
The CFThemeBuilder class used to create CFTheme used to set the theming for Drop checkout screen.
const theme = new CFThemeBuilder()
  .setNavigationBarBackgroundColor("#E64A19")
  .setNavigationBarTextColor("#FFFFFF")
  .setButtonBackgroundColor("#FFC107")
  .setButtonTextColor("#FFFFFF")
  .setPrimaryTextColor("#212121")
  .setSecondaryTextColor("#757575")
  .build();

4. Create a Drop Checkout Payment object
Use below code snippet for creating payment object for Drop Checkout
5. Setup Payment Callback
The SDK provides an interface CFCallback to receive callbacks from the SDK once the payment flow ends.
This protocol comprises of 2 methods:
public void onVerify(String orderID)public void onError(CFErrorResponse cfErrorResponse, String orderID)
Code snippet demonstrating its usage:
[typescript] import { CFErrorResponse, CFPaymentGatewayService, } from “react-native-cashfree-pg-sdk”; const App = () => { useEffect(() => { CFPaymentGatewayService.setCallback({ onVerify(orderID: string): void { console.log(“success “, orderID); mstStore.cartStore.emptyCart(mstStore.otpStore.userId); navigation.navigate(NAVIGATION.PaymentSuccess); }, onError(error: CFErrorResponse, orderID: string): void { console.log(“failed “, orderID); navigation.navigate(NAVIGATION.PaymentFailed); }, }); return () => CFPaymentGatewayService.removeCallback(); }, []); }; [/typescript]Now Combine all of the code above and it’s done follow the following code snippet .
[typescript] import { CFErrorResponse, CFPaymentGatewayService, } from “react-native-cashfree-pg-sdk”; const App = () => { useEffect(() => { CFPaymentGatewayService.setCallback({ onVerify(orderID: string): void { console.log(“success “, orderID); mstStore.cartStore.emptyCart(mstStore.otpStore.userId); navigation.navigate(NAVIGATION.PaymentSuccess); }, onError(error: CFErrorResponse, orderID: string): void { console.log(“failed “, orderID); navigation.navigate(NAVIGATION.PaymentFailed); }, }); return () => CFPaymentGatewayService.removeCallback(); }, []); const startCheckout = () => { try { const session = new CFSession( “payment_session_id”, “order_id”, CFEnvironment.SANDBOX ); const paymentModes = new CFPaymentComponentBuilder() .add(CFPaymentModes.CARD) .add(CFPaymentModes.UPI) .add(CFPaymentModes.NB) .add(CFPaymentModes.WALLET) .add(CFPaymentModes.PAY_LATER) .build(); const theme = new CFThemeBuilder() .setNavigationBarBackgroundColor(“#E64A19”) .setNavigationBarTextColor(“#FFFFFF”) .setButtonBackgroundColor(“#FFC107”) .setButtonTextColor(“#FFFFFF”) .setPrimaryTextColor(“#212121”) .setSecondaryTextColor(“#757575”) .build(); const dropPayment = new CFDropCheckoutPayment( session, paymentModes, theme ); CFPaymentGatewayService.doPayment(dropPayment); } catch (e: any) { console.log(e.message); } }; }; [/typescript]Now Call the startCheckout function and pass the payment_session_id and order_id in the session object and then you will be able to make payments from the SDK.
After calling the startCheckout function you will be redirected to the following screen
Now choose your preferred payment method and click on pay In test environment you’ll be able to see two simulation options
- To simulate Success
- To Simulate Failure
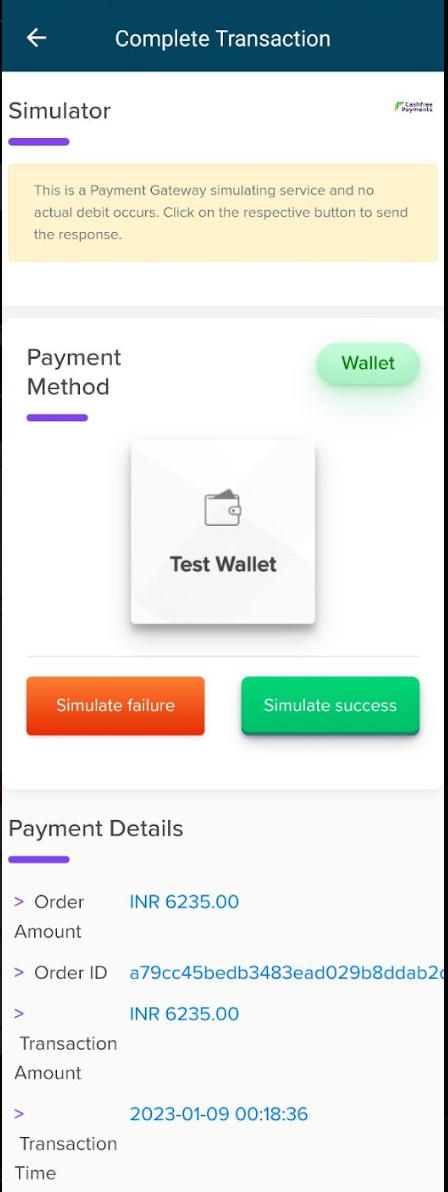
After Clicking on Success or Failure the payment will be completed
4. Now all there is left to verify payment which will be done from the backend and it’s done.
Thus, we have successfully integrated the Cashfree payment service in our React Native app easily.
Thank you
Hope you liked this article. Happy Learning!